feedspot.com/wp-content/uploads/2017/11/woodturning_216px.png

Sunday, 12 April 2020

New Project Bench Seat restoration.1

As I have completed my coffee Table Project I was thinking what else could I do to keep me busy.
We have had a Bench Seat in the front of our Bungalow chained to the wall because the last one was stolen.It has been there for about ten years so was desperately in need of restoring to its original or better condition.The ends are cast iron so only need a wire brushing and the decorative panels are tin so will need wire brushing and painting.
I have made a start and will inc a few pics on my Blog as I go.

Because all the bolts were rusted up they had to be cut off with the disc grinder .The disc Grinder is fitted with a very thin metal cutting disc very efficient.Not forgetting to use full face protection in my opinion just protecting the eyes is not enough.


 As you can see it has seen better days


 The panel is held in with screws they were too rusty to unscrew so I prised it all apart


That is the dismantling completed ready for cleaning painting and new woodwork. 


Saturday, 11 April 2020

Lock Down update 12

That is this Project Completed I hope you like it and if you do please comment

The Frame and legs fitted and a coat of Danish oil applied
 Turned and another coat of Danish oil on the top this is the third coat and it is looking good 
 That's it the finished job.


If you found this interesting please comment if you didn't why are you still watching LOL

Friday, 10 April 2020

Lock Down Update 11

There was not a lot to do today most of the work is done now .The frame and legs are glued up and tomorrow I will give the whole thing a hand sanding and then fix to the top.

 The frame and legs will not be glued to the top they will fixe with buttons into slots as the picture shows this allows for any movement.
Tomorrow should be my last update because it will all be finished.

Thursday, 9 April 2020

Lock down update 10

Spent some time today correcting my mistakes a bit of work but worth it because I learned a lot.

As you will know if you saw yesterdays Blog I had made a couple of mistakes and today I put them right.
I had to make new rails and cut new mortices on them.
I have raided my stash of Ash to make new rails it is bone dry and stunning grain

 This is the piece I have picked out.
 The Tenons have been made on the Table saw by setting the depth of the cut and running the board over the top then nibbling the waste off by moving the board along a bit at a time.

 Cut Tenon
 Dry fitted and checked ready for gluing ut tomorrow
 Completed Mortice and Tenon.You can see the saw marks where the waste was nibbled off a bit at a time.
Coming up together some sanding glueing and the frame and legs will be ready to fix to the top.

Wednesday, 8 April 2020

Lock down Update 9

Hi all a bit of a set back today but all part of the learning curve.

I was not sure how to fix the legs and frame to the Coffee Table top so sent a couple of pics to my Brother Chris to ask his advise as he is a Joiner and Machinist .He told me the best way to do it which I will show you on the new rails.
He pointed out some errors I had made and how I had made life difficult for myself.
The picture below shows a dry fit and nothing is glued .If you look carefully at the picture you will see that the rails go strait into the Mortise and this is wrong there should be a proper Tenon on the end of the rails and the shoulder on the rail should be against the leg with the Tenon going into the Mortise.There should also be a small gap between the end of the Tenon and the bottom of the Mortice.It was also pointed out that taking the Taper the full length of the Leg makes it more complicated when making the mortise on the end of rail because the shoulders would have to be cut at a corresponding angle so the best way is to stop the taper below the rail creating a parallel surface to fit the rail to.


This picture shows the dry fit and is the one I sent to Chris from this picture he was able to point out my errors and give me some sound advise

 This is the other picture I sent to him

So rather than carry on knowing I was wrong I have reduced the Taper on the legs and they now end below the rail I will have to make new rails because these will not be thick enough to create a proper Tenon using the existing Mortise. 

 You can see from this picture that the leg on the left is now parallel for about 4" from the top ending below the 3"rail.
 All four legs with the reduced Taper.This has created another small problem the depth of the Mortise is now reduced
 Back to the Router table to increase the depth of the Mortise's
 Here you can see the added depth .as you can see the Mortise is not stopped below the top of the legs and next time I would stop about 1/2" down and let the shoulder on the rails go all the way around this would be the correct way to do it.
 I have four Blades for my Sawbench and dont like any of them so a trip to Screwfix on Click and collect I got a new Freud Blade and it is perfect.

 Tomorrow I will make the new rails and this time do them properly as I say it is all part of the learning curve so I dont mind

Tuesday, 7 April 2020

Lock Down Update 8


I have been waiting for a Delivery from Axminster Tools Titebond Glue and  Liberon Superior Danish oil .Ordered on Friday delivered on Monday .Good service and free delivery.


 That was yesterday and all I could do was glue up and wait until the glue cured for about 24 Hours.
This pic shows the four legs glued up and securely clamped.

The glued up legs are now cured enough to work on so I have set up the Planer and the Thicknesser to true them up.
 Checking the Planer fence is upright because I want these to be dead square and all exactly the same size.
 That is them planed square and Thicknessed to exact size
 After Planing and Thicknessing back through the Drum Sander 180 grit gives a perfect finnish if the feed speed is low.

This is where I have to be very careful and concentrate I have a habit of Buggering things up  if I dont.The ends are carefully marked so that the right sides are tapered easy to make a mistake at this stage.

 On the Sawbench with the Tapering jig that I made it is only a one off so nothing fancy.
 As you can see the slots have been Routered into the legs ready to take the rails.They now have two rough sides strait of the sawbench and will need sanding

 This is a nice set of extra long 1/2" Router Bits I bought several years ago perfect for use with a Router Table.
The two tapered sides are now sanded on the Belt sander a very useful bit of kit 180 grit leaves a perfect finnish.


 Just had a delivery of a new Toy from Axminster Tools ordered yesterday delivered today a Trend Digital depth gauge this will make setting up the Router easier.

 All four legs Squared tapered , routed and sanded ready for gluing to the rails and fixing to the Table top I will probably do that tomorrow.


Saturday, 4 April 2020

Lock down Update 7

With my Table top finished I now have to do the legs.
I was not sure what sort of legs to do so decided on square at the top to tapered on both insides of the legs and a top rail to secure it all together.
I could only do preparation of the wood today because I am waiting for a Glue delivery from Axminster tools on Monday.

A few pics to be going on with

All the wood planed and thicknessed ready to be cut to exact lengths

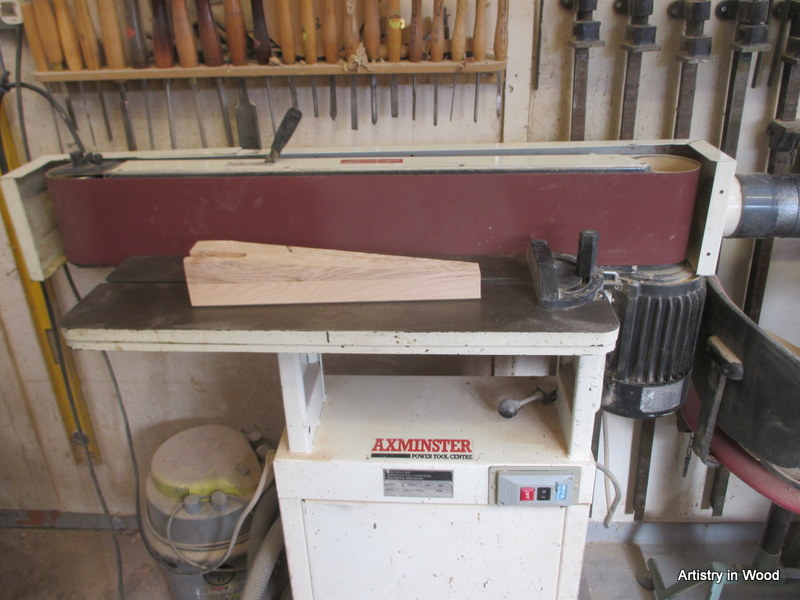
 Made a tapering Jig ready to taper the legs
 I was going to do all the cutting to length on the Bandsaw but decided it is just not accurate enough.
I have a really good Table saw but it takes a bit of time to set up because the sliding table assembly is taken off so that it can be put into a slot by the bench.
This means to use it I have to bring it out and put it together.
It is on Wheels so not too bad.
This gave me an opportunity to clean behind it and as a bonus I found a pack of 5 Band saw blades behind it.
This is a very accurate Saw Bench and gives a far better cut than the Bandsaw.


I want the top of the legs to be 75mm square this gave me a bit of a problem as I dont have any 75mm square Ash.
To get over this I am gluing the legs up from two equal pieces 37.5mm to give me 75mm square.
The legs are 400mm long giving me an overall table height of 400mm + 50mm inc top
This picture shows the 8 half legs and the 4 rails all cut to accurate lengths.
 Just a practice piece to get the slot right for slotting the rails into the legs eventually.
Table Saw packed away ready for next time it is a pity I dont have the room to keep it set up I would use it more