feedspot.com/wp-content/uploads/2017/11/woodturning_216px.png

Tuesday 31 March 2020

1st coat Danish oil on Coffee Table

Gave my Coffee table top a final hand sanding down to 600m Grit today and applied a coat of Danish oil.Next job to make legs but today was spent spring cleaning the Workshop.

A few random pics of oiled table top


Monday 30 March 2020

Lock down update 6

Up until yesterday I had only fitted one end so yesterday I thought I would fit the other end and was sure it would be simple and nothing could go wrong.
As I had a comment on my Number 5 update that it looked complicated probably because I had not explained it well enough I decided to take more pics and see if I could do better.
The next 4 pics are what I did yesterday and I will go through them with you .

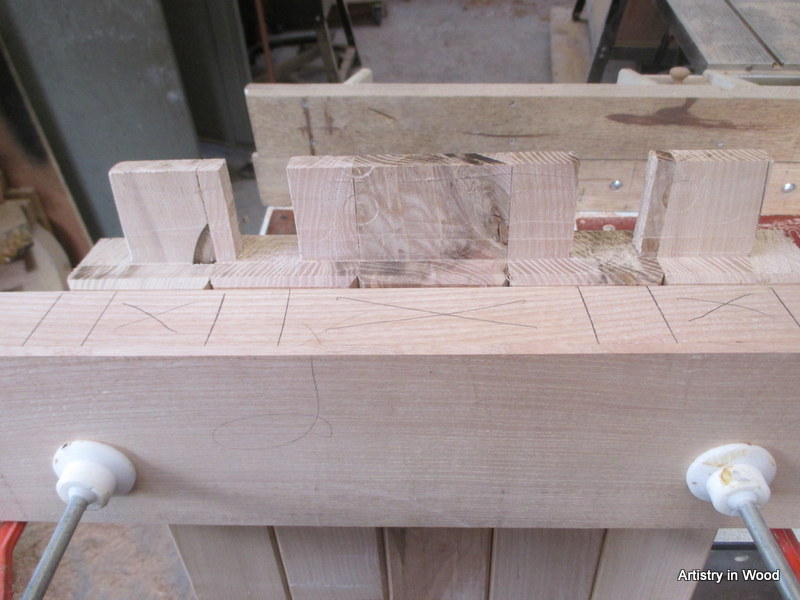
In this first pick you can see the Tenons with the holes drilled slightly closer to the shoulder so that when the dowels are driven in it will squeeze the end up tight to the shoulder.
 This shows the end board on top of and in line with the holes in the Mortices and the holes only go through as far as the bottom of the Mortice not right through.
 This is as far as the Dowels will go and only the top will be glued
 As you can see here it is all lined up.Then I fitted the end Board complete with glued Dowels.

This is where it all went wrong I was lying in bed this morning thinking about how to make this clearer on my Blog when it downed on me I had not elongated the holes in the Mortices to allow for movement.The other end was Ok I could remember doing it.As the whole object of the exercise is to allow for expansion and contraction it had to be put right.

Luckily I was able to drill out the Dowels without doing any damage and start again all part of the learning curve
This is the Pic of the holes from the other end elongated with a rasp and I have done the same on this end.
Loading up the Drum sander with some new 180 Grit abrasive


 A couple of passes on both sides now the top irs completed just a bit of hand sanding to finish the top and now I have to think about Legs.
 Put a small Mitre all around the top and bottom on the Router Table.
 With the top now finished the next thing is to make the legs and decide which way up the top will be both sides are very nice.


Saturday 28 March 2020

Lockdown update 5 Coffee table


I did not do a lot today just made and fixed one Bread Board end .As I had never done one before it took quite a bit of thinking about but the other one should be easier.

I have purposely left the End Board over length so that I could cut a piece of and cut a Mortice in it as a test piece.Morticer all set up with 1/2" bit and Chisel.

This picture shows the extra length of the End Board

 Positions of the Mortices marked out and ready to be cut The Mortices will all be cut out slightly longer to allow for Expansion and Contraction I forgot to take a picture of the Mortices after they were cut I will take one when I do the other end.
 Mortices cut and checked for fit The End Board is now marked out for the position of the Dowels
 The Dowels will go through one side only of the End Board and into the Tenons but will stop at the bottom of the Tenons .The holes in the Tenons have been drilled about 2mm closer to the shoulder and elongated.This is so that when I drive the Dowels in they will squeeze the End Board up tight to the shoulder.The holes are elongated to allow for sideways movement if the Boards expand.

 Dowels driven in and glue applied to the section that is in the End Board only
 I now need to remove the excess length of the End Board and this is being done on the Bandsaw.Some time ago to improve my Bandsaw I fitted a fence from Axminster tools a very useful bit of kit.It can be used upright or on its side and will slide the full length of the fence.Here I have lined it up with the blade

 I am now able to slide the fence back to allow room to have the excess wood in front of the fence but still have the full length of the fence as a guide.


 The Dowels have been driven in and only the top glued.This is the only glue on the end boards they are held in by the Dowels.The Dowels are cut of with a Japanese pull saw the paper is to protect the Board.
 Dowels Sanded off flush
 Not a very clear picture of the sanded off Dowels making sure the grain on the Dowels was all aligned in the same direction .
I hope I have explains this clearly if not comment and I will try to explain it better

Friday 27 March 2020

Lockdown update 4

The garden is now up together Greenhouse sorted and half the Summer house painted.
Found time to do a bit more on the Coffee Table today.
I did not do too much as I dont want to everything in 5 minutes then run out of things to do..

All ready set up to do the second side of the Mortice
 That is looking Ok.I have made the Mortice smaller than i intended because I decided the ends at 150 mm looked too big.So am reducing the end boards down to 75mm which is the same as the long boards I think it will look more balanced.So the Tenons are now 50mm.
 Using hand tools for some of the jobs but to be honest I dont like using them I much prefere Machinery and Power tools

 That is the Tenons sorted I will be making the end boards complete with Mortices tomorrow
 The tenons need to be a snug fit because the end boards will not be glued they will have wooden dowels.
 Not everything is made using Power tool or Machinery sometimes it is just as easy to use hand tools.

Saturday 21 March 2020

Lock down update 3


Removed the Table top from the clamps it has had about 24 hours for the glue to dry
Cut to length with the Radial Arm Saw


 Drum sander set up with 180 grit abrasive.
 One pass through the sander on both sides to make sure it is dead flat.
 As I am going to make the top with Bread board ends. I need to make Tenons on the table top and Mortises on the ends.I thought about creating the Tenons with the Radial Arm saw but decided it would be easier with a Router.This is my Bandsaw fence being used as a guide for the router.The Router is fitted with a strait cutter set at the finished depth and the wood is nibled of a bit at a time until the final guide fence setting is reached.

 That is it 3" Tenons because that is as deep as my Mortiser will reach
 That is both ends done on one side
 Set up now to do the Tenons on the other side but tha is fo my next update.

If you are following this please comment and let me know what you think good or bad.

Friday 20 March 2020

Lock down Update 2

Further to my WIP on making a Coffee Table.


Setting up ready to cut Biscuit joint slots.
I am always a bit short of Bench space so find my paper hanging table useful it is very rigid and when I am not using it folds up.
 Before cutting biscuit slots I have decided to chamfer all four sides of the boards so that when they are assembled it will be an added feature.This is my Router table and I used a chamfer bit.Useful feature with this table is the Router lift it makes height adjustments accurate and easy.Brother Chris and I made two of these tables years ago one each.
 Table tucked away until next time
 Biscuit slots ready for gluing up
 All glued up with PVA glue  The Biscuits slot into the slots on both pieces of wood and when they expand it creates a strong joint.Stronger that just the Glue.

 You can just make out the V shapes in the joints
 This is a better picture
I will carry on with this WIP if you have any questions or comments please leave them below.Comments are always very welcome

Thursday 19 March 2020

In Lock down


Because of the Corona Virus I am considered at risk due to my Asthma and age 72 years young.
Therefore we have gone into lock down for the foreseeable future.
I dont actually mind I am very lucky to have a large garden and my Workshop in the garden.
I am looking on it as an opportunity to explore making new works nothing to do with woodturning
I have loads of Woodturned stock so no point adding to it.
I thought I would do some Joinery I have all the Machines and materials so thought I would start by Making an Ash Coffee Table.
As I said I have all the Machinery but am not an experienced Joiner or Machinist.
Over the years I have been lucky that my Brother Chris who is a Joiner and Machinist has given me quite a bit of tuition.

So here we go a WIP on how I am making my Coffee Table

A lot of things to take into consideration.
The main consideration being Expansion and Contraction of the wood.
I would have liked to have made the top out of one wide piece of Ash but in would probably have warped and cupped.
To avoid this I have decided to cut the top into 5 boards of equal width and join them and use Bread board joints on the two ends
This will allow for Expansion and Contraction.
I am taking pictures as I progress and explaining as best I can .

This a plank of the Ash I bought recently stunning grain
 A closer look at the grain
 I have cleared the floor space to give me room for Joinery instead of Woodturning
 To take some of the weight out of the board I have cut a chunk of the end.
 I have left the board longer than the finished top will be to allow some to be cut of because when I prepare the boards by planing and thicknessing you sometimes get snipe on the ends from the thicknesser.
 A new 3/4" blade fitted and guides adjusted .The guides are dropped quite close to the thickness of the timber to limit any chance of the blade wandering.I do have a Bench saw that would have done this but decided to use the Bandsaw because of the thinner blade I want to grain match as much as possible on the finished top.
 Because I wanted to remove the live edge a strait edge is clamped to the underside of the board so as to slide along the edge of the table to give a strait cut.

 Planer and Thickness set up ready
 Bandsaw fence set up for three and one eighth of an inch cuts.
The board has been given one strait edge on the planer ready to go against the fence.
As each board is cut it will then have one edge planed flat to go against the fence for the next cut
 One end has been marked and numbered so that I can keep the boards in order to keep grain alinement on the finished top
 All the boards are now cut ready for final planing and thicknessing
 One side and one edge planed and squared ready for thicknessing Face edge and face side marks for future reference
 boards planed and thicknessed

 That is the 5 boards and end boards finished and ready for the next process
If you have any questions or you want to comment please do and if you go to the bottom of the page you can sign up for future notifications