feedspot.com/wp-content/uploads/2017/11/woodturning_216px.png

Wednesday, 16 March 2011

A much better day.

Today has gone better than yesterday which was mostly a desaster.
TodayIi have managed to complete six textured and coloured wide rimmed bowls towards the order of ten for a Gallery.
They all have to be coloured and differant so today I was in production mode and completed six of ten.
I already have six in stock so I now have to concentrate on the ten coloured Hollow forms for the order.


A little bit of touuching up and some buffing on these tommorow and they will be gallery quality.

Tuesday, 15 March 2011

Not a good day


It has not been a good day.
I have had an order from a gallery to supply them with 10 coloured Hollow forms 10 wide rimmed coloured bowls and 10 Acrylic pens ready for Easter.
I have about 4 Hollow forms about 4 bowls and no pens so I thought I would make a start today.
It might have been better to have stayed in bed.
The first Hollow form was so thin that when i started sanding i sanded through the side.
The second one come out a mud colour.
I gave up then until about five o clock and I made a nice bowl so all is not lost.

Sunday, 6 March 2011

Hollowing systems.

Many of you will know that a lot of my work involves hollowing.
Over the years I Have owned or tried a number of different hollowing systems.
I thought I would give you my views on a few different systems.
I have no allegiance to any manufacturer and no axe to grind.
This is just my own personal view.

The first system  bought was the Hamlet Big brother and Little brother systems.
Because this system did not have an articulated head I thought this would restrict the kind of hollowing I would be able to do.
To overcome this I made my own handles with articulated heads from stainless steel.
The big one is 1000mm x 20mm and the small one is 740mm x 16mm .
These worked but I cant say as achieved a great deal with them which was probably mostly down to my lack of skill at the time.

The next system I bought was a Lazar guided deep hollowing system that was fixed to the lathe bed and the cutter arm rested on the tool rest.
This is a very good system and the only thing i could fault about it is that it is very impersonal.
It was too much like using a machine.
That said you can hollow through a reasonably small hole and due to the Lazar guidance facility you could hollow very thin walled vessels with ease.
This system would be ideal for anybody that suffered with any weakness in their arms.
I still have this system and you can have it for £120  00 + shipping.
Throughout the evolution of my hollow form turning there are two tools that I have had since day one and still frequently use.
They are the Robert Sorby scraper that I use with a round cutter for shear scraping and the Henry Taylor scraper that are used with a variety of tips.


The Roly Munro hollowing tool.

The Roly Munro that I have is the 5/8"  and has given me good service for several years.
The only thing i was disappointed with was the handle within days of buying it the thread on the grub screw that holds the shaft in stripped.
A mate of mine who is an engineer fitted a helecoil in the handle which cured the problem.
I think they have done something since to improve the handle but I am not sure.
To me the handle seemed a little bit light for the shaft so I have been using the Robert Sorby handle which seems to balance the shaft perfectly.
All in all I think this is a great tool and has always done everything expected of it.

Next my 1/2" Kelton scrapers.


I have been using the Kelton scrapers for a couple of years now.
For the past couple of years I have used these for most of my hollowing they are that bit thinner diameter than the Roly Munro enabling me to work through a smaller hole.
Being only 1/8" thinner does not seem a lot but it is surprising the difference it can make when hollowing.
I use these with the handle for the Roly Munro I bought them un handled and they seem to be nicely balanced in this handle.
These are a very cheap option for hollowing as they are reasonably priced and quite capable of hollowing to about 8" deep.
Although these have been used  for most of my hollowing work in the last two years  the only sharpening they have needed is to hone the tip with a diamond hone occasionally.

The Robert Sorby Sovereign Ultima.

Below is a link to a short vidio on the Sovereign system.


I do not own the Robert Sorby Sovereign system but I have had access to one and  have seen it demonstrated by Chris Pouncy from Sorby.
In my opinion it is a well engineered piece of kit over engineered if anything.
It does everything that Sorby claim it will do but I feel that the big diameter head restricts it for working through a small hole.
It is a pity they did not make the head the same diameter of the shaft.
The handle is superb and as I have said previously I use it on the Roly Munro shaft.

The Revolution Hollowing system by Crown tools.
Below is a link to a short Vidio on the Revolution Hollowing system.


I have bought this new system but as yet have not had the time to try it out due to pressure of work.
I hope to be able to give it a proper work out later in the week and will be giving you my opinion on it.

Yesterday I had a day with Mark Sanger and had a play with the new Crown texturing system.
I did not intend doing very much I was going to have a quiet day.
But being the workaholic that I am I could not rest when I got home.
I have been intending to give the Revolution hollowing system from Crown a workout when I had time.
Well I have just had an order for ten hollow forms for a new gallery  so this is an ideal opportunity to give it a go.
At six o clock I thought I would give my workshop a good clean but after about ten minutes i spotted the Revolution hollowing tool and decided to give it a go.
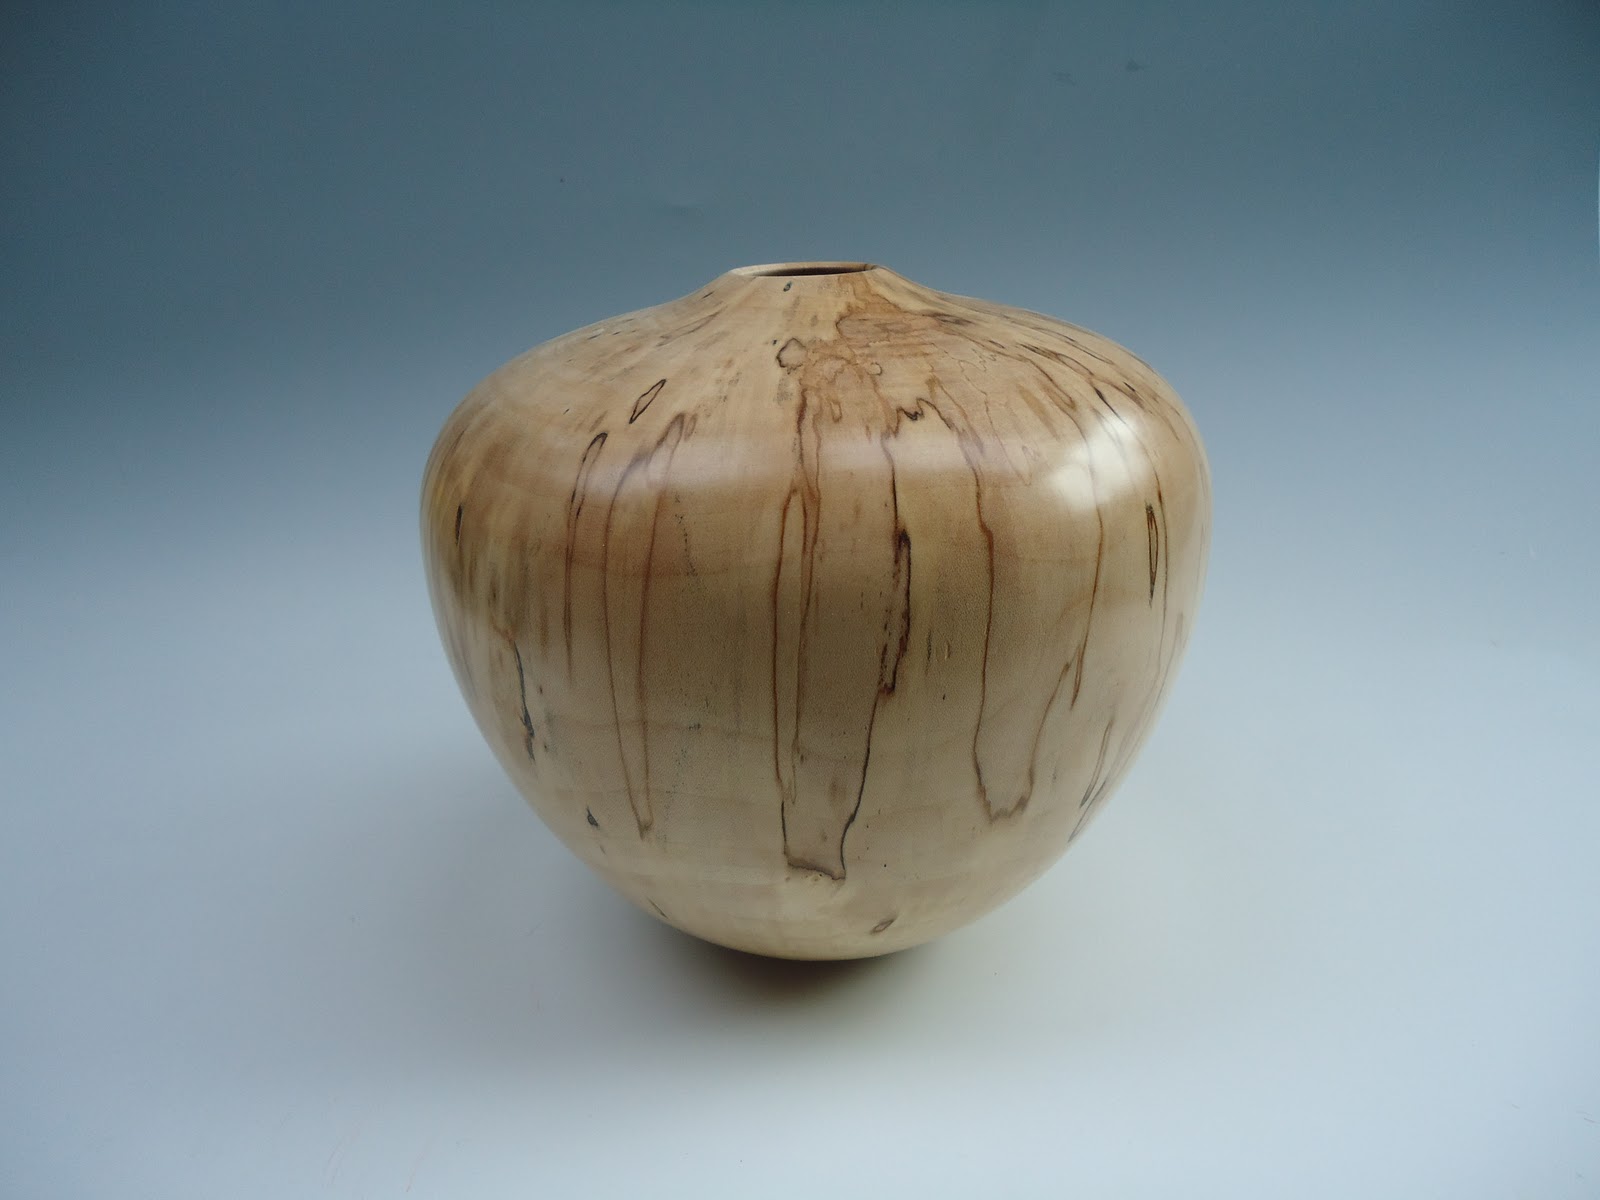
Earlier in the day i had picked up some Sycamore that has been drying for about 6 years and it is nice and dry.
I managed to get two nice hollow form blanks out of one of the pieces and noted that it had started to spalt.
My order for 10 forms are supposed to be coloured but these are just too nice to colour.
If the customer does not want them somebody else will.
The blanks are from branch wood and the pith is in the centre so I mounted the first one with the pith aligned to the centre of the vessel.
I completed the outside and sanded down to 600 grit.
Next I drilled an 18mm hole to within about 3/8" from the bottom ready for hollowing.
First i cut from the centre to the underside of the shoulder with nice sweeping cuts and as i went deeper I found the tool would cut on both the push cut and pull cut equally well.
There is a bit of a knack to getting the best cut but once you find it it is not difficult to repeat.I took out the bulk of the material then went on to carefully refine the thickness to about 1/4 of an inch which is not too bad for a vessel of this size 8" x 8" .
The surface was surprisingly good considering the wood is spalted and a bit punky.
I would probably have been satisfied with the finish but i had not tried the scraper yet.
A few minutes with the scraper and the finish was good.
I sanded inside as far as I could reach reversed the piece into a jam chuck ready for buffing and polishing. 
I completed this one from start to finish in a little under three hours.
I never intended doing this much and it was 9 pm when I finished

That was yesterday.
This morning I completed the second hollow form which is exactly the same size in just under two hours.
This one is a little over 1/8" thick .
I am pleased with that as it shows I have now got the knack of this new tool.


I first had a go for about five minutes with this tool at Mark Sangers a few weeks age and this is the first opportunity I have had to give it a real go.
My first impressions then where that this was going to be a great tool and my experience on these two hollow forms bears this out.
As I have said before I have no axe to grind and no elegance to any maker.
This will definitely be my tool of choice for hollowing in the future it is unbelievable value for money when you compare it to its rivals.
I have had several Emails asking where can they buy the Revolution hollowing system from.
I bought mine from Mark Sanger.http://www.marksanger.co.uk/revolution%20hollowing%20system.html

Negative rake scraper.

On my Blog i have been asked the question what is a negative Rake scraper.
I have googled it and found this very good description
This site explains it a lot better than i could.

http://www.hiltonhandcraft.com/Articles/The%20Negative%20Rake%20Scraper.pdf

Saturday, 5 March 2011

Two more satisfied customers

Today I have been teaching two novice turners.Neither one has ever done any turning before.
I always find it very satisfying teaching novices  because they always seem to go away with something they have made and big smiles on their faces.
I start novices off making a bowl as it something they can grasp without being swamped by too much info.
Lessons start by a safety briefing to make sure they understand that woodturning is a very safe hobby if you stick to a few basic rules.I then go over the lathe basics and wood holding
I explain the advantages and disadvantages of different holding methods I consider this to be part of the safety briefing.
Now i explain to them the structure of wood and this helps them understand the advantage of working with the grain.
Now it is time to get down to what they came here for producing something to take home.
One blank was held on a screw Chuck and the other between stebcentre and tailstock.
Both blanks are supported by the tailstocks for safety.
Bottoms are roughed down with bowl gouges using push and pull cuts and spigots created ready for reverse chucking.
The initial finishing prior to sanding was carried out with negative rake scrapers.
The differences between conventional and negative rake scrapers explained.
After sanding through the grits the pieces are reverse chucked.
Today this was completed by 12 30 pm so we stopped for lunch.
Lunch over I make sure that everything we have done up to then is understood and any issues or questions are addressed.
Before we started making the bowls i gave the students a selection to look at so they could decide which they wanted to make.
Stuart "Thats the big One" wanted to make a wide rimmed bowl with an OG bottom.
Ian " Thats the slim one" wanted to make  a conventional shaped bowl with a round bottom.
This was good as it gave us the opportunity to explore the two different shapes.
Both students were encouraged to face the blanks off with push and pull cuts.
The insides of the bowls were turned out with bowl gouges and finished ready for sanding with negative rake scrapers.
Bowls sanded through he grit and abrasives sizes and materials explained the pieces are buffed and polished Pics to follow.If you want to make the pics bigger click on it.

Both students took to woodturning really well which made my job very easy.

This is Ian rubbing the bevel and getting lovely shavings


This is Stuart he is a big lad so i let him use the big lathe.

Ian turning out the centre nice shaving again
Stewart turning out the centre.
Ian power sanding both students  were shown the benefits of hand sanding and power sanding.
Stewart doing his sanding he is very fussy and and would accept nothing less than perfect Ian was just as particular which pleased me as i don't let anything less than perfect leave my workshop
Sanding done and the pieces are buffed to about 2000 grit.

This was all finished by about 3 30pm which left just enough time to make a couple of weed pots.
The Bowls are made from Beech and the weed pots from Holm Oak.
Here we have two very happy woodturners.
Very well done both of you.

Thursday, 3 March 2011

Teaching today

Today i have had two pupils Sue who has been turning for 6 months has her own lathe and is coming along nicely.
Roger who has never turned before and has had his first lesson today.
Sue turned a big mallet head out of Horse chestnut for her son Adam to knock in fence Post.
Then she made a very nice weed pot out of Yew which she coloured with spirit stain.

Roger made a very nice bowl finished to a very high standard with a carved and scorched rim.
Here are some pics from todays lesson.

Making a Good start.

Now he is getting into it and making real shavings.
Sue roughing down her mallet head,
Outside finished now for the inside.
Inside finished ready to do some carving on the rim

Here we have two very satisfied customers,

All in all a very good day well done Roger and Sue.

Wednesday, 2 March 2011

Simple segmented bowl.

Hi all.
I have just made this simple segmented bowl.
I think it looks quite good i will show you how it is done.
I am teaching tomorrow and Saturday but i will try and fit it in.


To make this bowl i used approx 6' off 12" x 1" yellow pine board available from most builders merchants
that supply timber.
It is made up from 12 pieces end grain and 3 pieces long grain 3 1/2" thick .
This piece could be made with nothing more than a bandsaw and some clamps if that is all you had.
I started off by cutting 12 pieces from the end of the board with my sliding chop saw.

Because yellow pine is so fast growing the growth rings are very big and the board has
only been through a planner at the mill I like to sand it so that I get a nice surface for gluing.
I have done this on a belt sander simply because i have one but there is no reason why this could not be done by hand.
I have used PVA glue at this stage because i am in no hurry and will be leaving the glued up block over night.

The one thing you cannot get away with is decent clamps this is essential if you are going to get tight joints.
I clamp up as tight as i possibly can and have made a lot of segmented bowls and never had one fly apart."Touch wood"
My brother Chris makes segmented bowls without clamps by using his large woodworkers vise.
Not many of us have a vise that opens that wide but i suppose if you were going to make a lot of segmented work it might be worth considering.


You cannot skimp on the glue when you do segmented work or you could end up with dry areas and the problems of your work coming apart on the lathe.
After gluing up this block needs cutting into three equal parts ready for the three slices of long grain to be glued in.
I found that it was about a 1/4" too thick for the chop saw.
Just to see how good a cut I would get I took a thin slice off one side with my bandsaw and a 1" blade.
I was not really happy with the finish.
It would have been Ok if I was prepared to do a lot of sanding.
I have a bench saw that is capable of cutting this thickness but I have to move it out and put the sliding table on and i could not be bothered.
So not happy with this and cannot be bothered to sort out the table
saw I put plat C into practise.
A quick phone call to my mate Richard Fairbrother http://www.richardfairbrother.com/.
Richard has the best equipped workshop I have ever seen and makes the most beautiful Bespoke furniture.
Anyway he said he would be happy to do the cutting up for me.
First he run it over his planner so that it would sit nice and flat on the table saw.
Then he cut it into the three equal sections.
Thank you Richard.

I wanted to get on and get this finished now as I had other things to do so i thought i would give Gorilla glue a go to speed things up.
I  have never used gorilla glue before ,it said on the can 1/2"hour clamping time so i clamped it up for an hour to be on the safe side.
I am well impressed it was easy to use and after an hour it was cured and ready to use.


When you do this it is very important that you mark out your circle from the dead centre or when you have turned your bowl the two ends will look different.
Now we have a solid blank 12" diameter 3 1/2" thick ready to turn.
Because this is mostly end grain it is not easy to turn and requires very sharp tools and small cuts but I think the end result is worth it.


Not a bad result.
If you have any questions please use the comments below
and I will do my best to answer.