A few weeks ago I bought two nice oak Boards eight feet x thirteen inches x one inch thick.
One of the boards stayed quite flat so I cut it into rounds for chopping or Bread boards the other one cupped quite badly.
A one inch board that is cupped a good quarter of an inch is not a lot of good for anything so rather that waste it I had to put my thinking cap on.
What I come up with is to create a garden Sculpture with parts that move in the wind .
This way the Oak will be put to good use and I am doing a WIP as I go to share the idea with you.
I will not be able to do this in one go as it will take a bit of time and I don't seem to have a lot of time at the moment.
Anyway this is the start and if you are interested keep an eye on my Blog.
As you can see this is a very nice Oak board it would be a shame to waste it
This shows you how bad the cupping is and it is obviously rounded on the other side and if it was thicknessed there would be almost nothing left
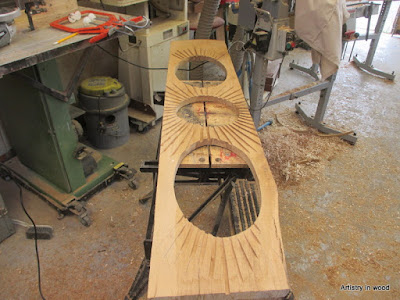
The oval holes were marked out with an oval jig that had been lying around for years just goes to show you never know when these things will come in handy .I think it was a pattern for the bottom shelf of a small table my Brother Chris gave me.The middle one done with a compass
That is the three holes cut out but a bit rough I am not the best with a Jigsaw
Although the whole thing will be scorched eventually I still did not want it to be too bad a shape so the holes were tidied up on the Bobbin sander
I cut the holes out about an inch bigger that the pattern but then had to cut the removed piece about half an inch smaller all round.I found a simple way was to move a builders pencil round as a distance piece this worked well.
This is now cut to size on the Bandsaw
The edge was then tidied up on the Belt sander.
This is the only bit of Woodturning on the whole thing the round piece sized and edge sanded on the lathe.
These three pieces are not as badly cupped as the whole board was because they came out of the centre and I did not want these to be as thick anyway so I run them through the thicknesser until flat they ended up about half an inch thick which is perfect
Because I wanted these to be flat and to a reasonable Finnish because there is a lot of work to be done on them later they were run through the Drum sander These will be cut up and turned into spirals then mounted in the holes for the wind to make them spin.
I decided that the main body of the Sculpture is a bit plain and needs something to make it more interesting so I have marked rays from the centres of the three inserts
I am going to cut the rays out roughly to the lines but no need to be too exact.They will be cut out with the mini grinder fitted with the three inch chainsaw toothed cutter.Now I hate this bloody thing and do not like using it but it is very good at removing wood quickly.Secured with clamps for safety
That is one side done now to do the other side.
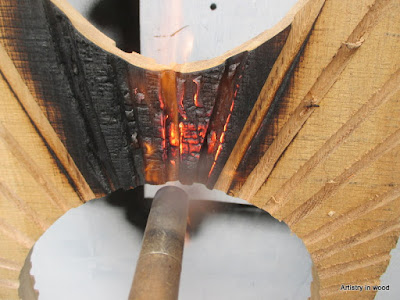
When the rays were cut out the were very strait sided and I want the rounded so the best way is to heavily scorch them as the whole frame will be scorched eventually anyway.
It is scorched until the wood crackles then you know it has had a good scorch this is done outside and not moved into the Workshop until you are sure it is no longer burning.
As you can see from this Pic the sides are dead strait
One side scorched and I have had enough for now.
A close up of the scorching.
Started to remove the charred wood with first a wire brush then a Bronze bristle brush
A bit more done today it is all coming up together
All of the scorching is now complete and the surface has had a good scrubbing with a course wire brush then a soft bronze bristle brush and finally a soft bristle brush as pic below .This has given the Oak a nice shine.
Here two coats of Danish oil have been applied to give protection as it is for out of doors
I have cut them all in half because it will be easier and safer for the next cutting exercise
The three inserts are now bandsawed up into slices ready for drilling.
Sixty two pieces on the three inserts and they all had to be drilled to thread a piece of thick stiff wire through.
Where they had been Bandsawed the bottom edges were quite rough so I hand sanded all sixty two pieces .
This is the round one
Next fitting the in the centre with a swivel top[ and bottom was a bit of a fiddle .Staples and fishing swivels did the job a treat
That is the first only two more to go
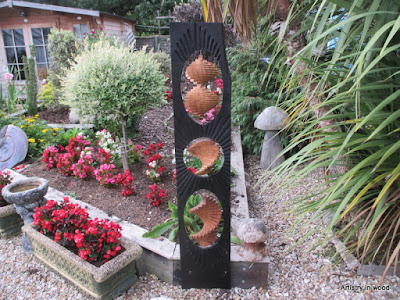
I am very pleased with how they turned out a lot of work but I think it is worth it and I think if I made one again I would do it exactly the same way.


The fishing-line swivels were a great idea....up until reading that bit I was wondering how you'd make the swivels work.
ReplyDeleteThank you Les we have not had enough wind to make it spin yet.It will probably take a force nine gale but I dont mind it looks good I think
ReplyDeleteA great read George, love the finished item and the swivels.
ReplyDeleteThank you Steve Jane and Kirsty I am pleased you like it as long as people keep looking I will keep doing.Thinking of doing some Videos but Sanger said I have too much of a West country accent but I recon if you can get away with it with your Brummie voice I will be Ok LOL
ReplyDelete