Up to now I have only made the first section.
I am not sure what sort of top I will make I will have to give it a bit of thought.
This is made from some green Oak kindly given to me by my Nephew Matt.
This piece is 28" long 6" x 6"
I have cut it on the badsaw to 3" x 3" top and 5" x 5" on the bottom.

Note that the blade guide is brought down close to the wood for safety and to support the blade.


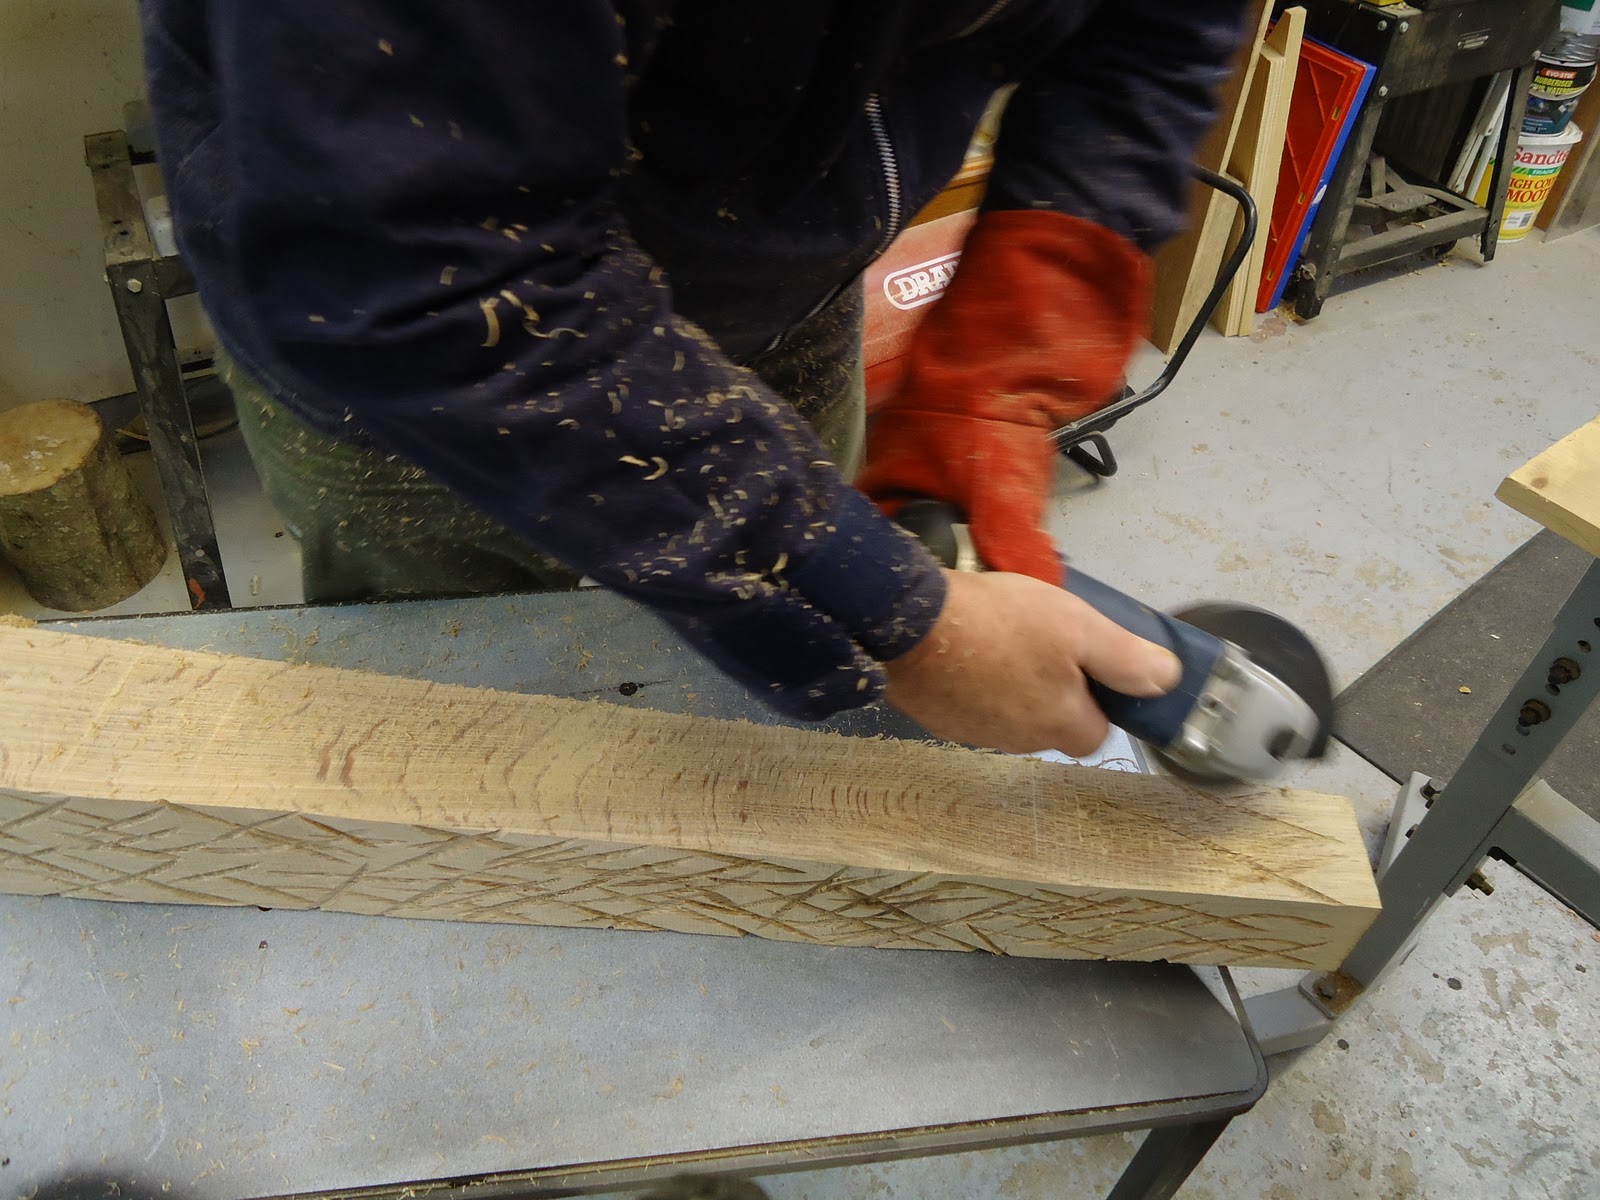
For this texturing I am using a 3" chainsaw toothed miny grinder.
Please note whenever I use one of these I always wear a welders glove on my left hand.
I don't know whether it would save me in an emergency but i am sure it would help.

I am always pleased to finish this bit as I don't really like using it.

Always have a spray bottle of water handy when scorching an never use a dust extractor.
A small spark can live for a long time in a dust extractor.

Next i go over it with this wire brush to soften the edges.

Now i will colour it with green Chestnut spirit stain applied with a diffuser.

That is that covered.

For the texturing i will use the Proxone with a chainsaw toothed cutter.
This is more controllable than the mini grinder.


I will add some red to brighten it up. after another light scorching to get rid of any fluff.


Yellow has been sprayed over the top I always finish with yellow as it seems to liven up the colours.


Suggestions welcome.
I have decided to try an Obelisk shaped top.
I have cut it to shape on the bandsaw.
I am going to carve it lightly with the Axminster carver a good tool but it does get very hot.

A light bit of carving and ready to scorch.
I don't know why but i seem to scorch everything.


Lets see what the completed thing looks like.


I am not at all happy how this has turned out.
The proportions are all wrong so it is back to the drawing board and see if i can make some improvements.
I have given this some thought and looked at a lot of pics.
I have always been interested in shells and fossils so i have made a top using this for inspiration.

I felt that It needed something bigger and bolder but I do not have very much big pieces of Oak.
Luckily a member of our woodturning club Giles brought me in a nice lump of Oak a couple of days ago.
As you can see this is quite green but OK for this job.
This is the piece roughed out to shape .

I wanted to get a spiral shape and tried tape a handsaw and a pencil.
None of these worked so i just did it by eye.
To create the carved spiral I have used my mini grinder with the chainsaw cutter.

I have mounted it now on the same pedestal as before as i like the contrast between the colouring and the bare wood.
On one pic it is shown with the middle section and one without as I am not sure yet which is best
I am also tempted to give the top a light scorching but I am not sure.


The temptation to scorch became too great so here is the result and I am pleased with it.
Click on the pic to make it bigger.


Thats it final pic.
The top two parts are on a dowel and fixed with hot melt glue.
Hi George
ReplyDeleteThis is a great improvement. The first idea was out of proportion and for me did not work at all.
I like the organic appeal of this against the geometric base which adds contrast of shape and texture.
Have you finished the top section, ?
Good to see you developing this. I think the shell idea is something that you could develop further.
Take care
Mark
Thank you for the comment Mark.
ReplyDeleteYesterday i had 155 page loads and not one comment.
Hi George
ReplyDeleteThat is much better. The scorching adds contrast and ties the top in with the base.
I would not get too disheartened that people do not comment. It is often the way with blogs. We do them so that people who are interested in our work can share our experiences. If you are getting this many hits you must be doing something right.
Thank you Mark.
ReplyDeleteThank you very much.
ReplyDeleteYes I agree it looks good George. Well done.
ReplyDeleteThank you Mark.
ReplyDeleteYur comments and input are always appreciated
Hi George, the end result is great.
ReplyDeleteYou got there!
This is a really informative blog with clear instructions.
Thank you for sharing this.
Are you not tempted to scorch the "shell" some more?
Jacqui
Hi Jacqui.
ReplyDeleteIt is always good to hear from you.
I am pleased you like my Blog.
No i will resist the temptation to do more scorching i it is important to know when to stop.
I've just seen this. I love the simple geometric base part on its own, without the shell and I love the shell as a stand alone sculpture. Sorry to be a BOF. I feel the shell is just a little too large for the column. The column itself is really cool.
ReplyDeleteRosemary
Hi Rosemary.
ReplyDeleteIt is in a gallery now without the collar and it looks good.
Everybody loves it but not enough to buy it yet.
Thank you for commenting all comments are very much appreciated.