feedspot.com/wp-content/uploads/2017/11/woodturning_216px.png

Sunday 26 June 2011

Finishing texturing and colouring weekend completed.

That is our Finishing texturing and colouring weekend over.
I am now exhausted but it was well worth the effort as everybody seemed to have had a great weekend.
I only have one pic from today but I am hoping i will get some Emailed to me.

Today we gave out feedback forms and asked our students to give us honest feedback as that would help us for future courses.
Here is some of the feed back comments.

Beyond whet I expected.

Interesting and stimulating day.

Completely exceeded my expectations.

Any questions were demonstrated and explained.

Very enjoyable.

Email received

Many thanks for a great day yesterday. I really enjoyed my time at Burnham-on-Sea. Your relaxed manner and honest reaction to all things do you credit. Your insight and forthright delivery, coupled with your knowledge of the subject made it a pleasure to attend the day texturing and colouring course

Saturday 25 June 2011

The first day of our Finishing texturing and colouring courses.

Today was the first of the Finishing texturing and colouring courses which I think was a great success.Everybody seemed to enjoy their day and I feel sure everybody learnt something.Here are a few random pics taken thought the day by Sue meads.


Not only did Sue Meads take pictures all day but she also made notes and here are her notes and observations.
George Foweraker / Mark Raby texturing and colouring workshop
Saturday June 25th 2011
After initial notes regarding health and safety were absorbed we were given some handy hints from Mark.
  • If fingers become hot while sanding STOP. Use less pressure and try a different angle.
  • NO kitchen towel for finishing - use specially designed cloths
  • Experiment to get the WOW factor. Create ideas for yourself. If it doesn’t work re-try.
  • Use Tack cloth while the Lathe is off.
  • Don’t fold Abranet because it creates a hard edge. Use Abranet to 400 grit and then –
    Scotchbrite / Webracks
    Green 600 – 800
    Red – 800 – 1,000
    Grey – 1,000 – 1,200
    White – non-abrasive
  • To finish wood –
    One coat of sanding sealer. De-nib with grey scothbrite. Tack cloth with a stationary lathe.  Then apply FRICTION POLSH – Speed an eez – with the lathe running. Be sparing with the friction polish. THEN apply Carnauba Wax with a light touch. Finish with White non-abrasive. Buff 
TEXTURING – George
Be creative in the tools you use. Nails, screws, basic workshop items will create texture.
CROWN SPIRAL TOOL
George demonstrated how differing pitch and twist profiles are made possible by altering the presentation angle of the cutter. The tool needed to be used with some pressure and the lathe running at about 1000 RPM. When the desired effect is achieved use a light wire brush or scorch on a still lathe. Try to scorch a darker outer rim and graduate to a lighter touch towards the inside. This draws the eye in.
CROWN TEXTURING TOOL
George used this to create  an effect that altered the tactile and visual qualities of the bowl. It added  that personal mark to the work. Orange peel, striated and ribbed patterns are possible.. Some of these effects were subtle some very coarse and aggressive depending on the angle of the cutter and the pressure George applied. The effects will also vary depending on the type of wood used – we were using sycamore .
ASHLEY ILES BEADING TOOL
We used this tool –  3,6,9 mm after the texturing had been achieved. George showed us that  the tool is presented handle-down as the front end has a bevel which, when the handle is held low, presents the flute at a nice cutting angle to the work. To cut the bead “wiggle” and gently lift the handle.  Once one bead is cut, placing the wing of the tool in the groove of the bead gave us a series of nicely aligned concentric beads.
To add colour George blew on MYLANDS SPIRIT STAINS. These can be diluted 50/50 with cellulose thinners. When a pleasing pattern is achieved sand gently with 150 grit and then lacquer with Autocare double coat acrylic.
ACRYLIC ARTISTS PAINTS can also create an individual pattern by being used on a moving lathe.
George then demonstrated LIberon Verdigris Wax which is a multi-purpose coloured wax that creates a  striking effect. It gives green hues of oxidised copper and brass. It can also be applied as a wax finish to bare or coloured wood. The wood is sanded to 240 and then beads were created, scorched and wire brushed. The Wax is then rubbed on with a nail brush and with the lathe running a flat piece of wood is offered over the face of the beads – a leather pad can also be used. The beads are cleaned out with a wire brush and the piece finished with gilt cream.
Jo Sonja Decorative Artists Acrylic paints
“are made with the finest quality, pure pigments, the colours will remain vibrant and true.The  paint has a beautiful, velvet matte finish associated with traditional gouache. They are water-resistant and will not chip or crack when cured. Excellent lightfastness.  Safe, water-based and clean up easily with soap and water.”
The piece to be decorated was sanded to 320 grit. Coatings of PLAST-KOTE gloss – red, turquoise and green were sprayed on a moving lathe. The Jo Sonje colours were mixed and put on by using fingers. They were left to dry, helped by a hot air gun. With the lathe spinning ROWNEY ACRYLIC ARTIST PAINTS were syringed around the top of the indent of the bowl. The effect created was to radiate to the rim of the bowl. A PROXON carving tool was used to add effect.
 MARK RABY – COLOURING
Use Of MYLANDS SPIRIT STAINS
Mark emphasised the importance of sanding any project with care. Sand through the grits gently, stop the lathe and horizontal sand.
The stain must be applied to BARE wood. It is fast drying and has good U.V. resistance. Always put on with safety cloth. White can be used to make pastel shades. The slower he lathe is turning, the more intense the colour will be. Take care to blend over the colour in bands. With the lathe stopped wash the colour over gently until the desired effect is achieved. To further enhance metallic effects can be used to highlight grain, bark, cracks etc. Acrylic sealer will lift the colours and fix them. Lightly de-nib ( grey ) and apply friction polish and carnuba wax. Burnishing cream will further lift the colours by buffing when there is no residue left on the cloth.
SECTIONING
Sand to 400 grit, seal and de-nib. Section using LINING TAPE – 3 and 6mm with a random pattern making sure to carefully seal where there is overlap. Ebonise, paint, texture, pyrograph etc etc each section Then seal with acrylic satin sealer.
Rub 'n Buff
A gildd wax in colours for antiquing a rough piece of wood. Sand to 80 grit and Tack. Use a dark spirit stain base colour. Squeeze a very small amount of Rub 'n Buff ANTIQUE GOLD from the tube and pick up with finger.   Rub evenly and thinly over a smooth or raised area using a gentle, rubbing motion.   Buff gently with a soft cloth or tissue to achieve a lustrous finish.  A soft cloth pad or short bristle brush may be substituted for fingertip.  Continue to build up colours taking off surplus with kitchen towel – China red, ebony, silver etc. Finish with Liberon Virdigris special effect wax applied liberally with kitchen towel. Finish with Acrylic sanding sealer.
TEXTURE PASTES
Add in whatever texture is required. Then colour with acrylic paint or Jo Sonje. Finish with Acrylic spray lacquer

A GREAT DAY
Thankyou to both

Wednesday 22 June 2011

First class service from Axminster tools.

The head on my Axminster power carver has chosen now to pack up.
I need it the weekend for our Finishing texturing and colouring courses.
I made a call to Axminster tools and spoke to a very nice young lady Who put me through to Kevan in Technical.I explained the problem to him and he went through a few checks to carry out to make sure it was the head.
As it was I had already carried out the checks he suggested.
That sorted he said I will send you on a new head today free of charge.
You cannot beat that for service and it is the reason I buy from them whenever possible.
Thank you Axminster and Kevan

Tuesday 21 June 2011

Looking forward to the weekend

I am now all ready for the weekend.
Mark Raby and myself are doing the first of our Finishing texturing and colouring courses.
We have a full house of six students on the Saturday and six on the sunday.
Our next courses will be in September so if you are interested you will need to get your name down as the places are gradually filling up.

Saturday 11 June 2011

Cutting up blanks again.

Today I had a few hours cutting up blanks.
Spalted Beech and Ash ranging from 18" x 2" to 12" x 3"
51 in total it will be a few months before they are usable .They have been air dryed.


Sunday 5 June 2011

Experimental bowl.

On the 25th and 26th of this month and again in September Mark Raby and I are running courses on Finishing texturing and colouring.
In readiness for this I have got some of the Jo Sonja's paint system from Mark Raby to practise with.
The Jo Sonja's system is a Iridescend paint system quite new to this country .Although Mark Raby is an expert with the system I have never tried it before.
I think there are a lot of possibilities with this paint and so I have been experimenting and here for you is one of the experiments.It never turned out quite as I had hoped but It is still not a bad result.
This is how you develop new ways to texture and colour,you play at it sometimes you get results you are pleased with sometimes not.It is all part of the fun.

This is one of my experiments and I think it is a success so I thought I would produce something similar but different.


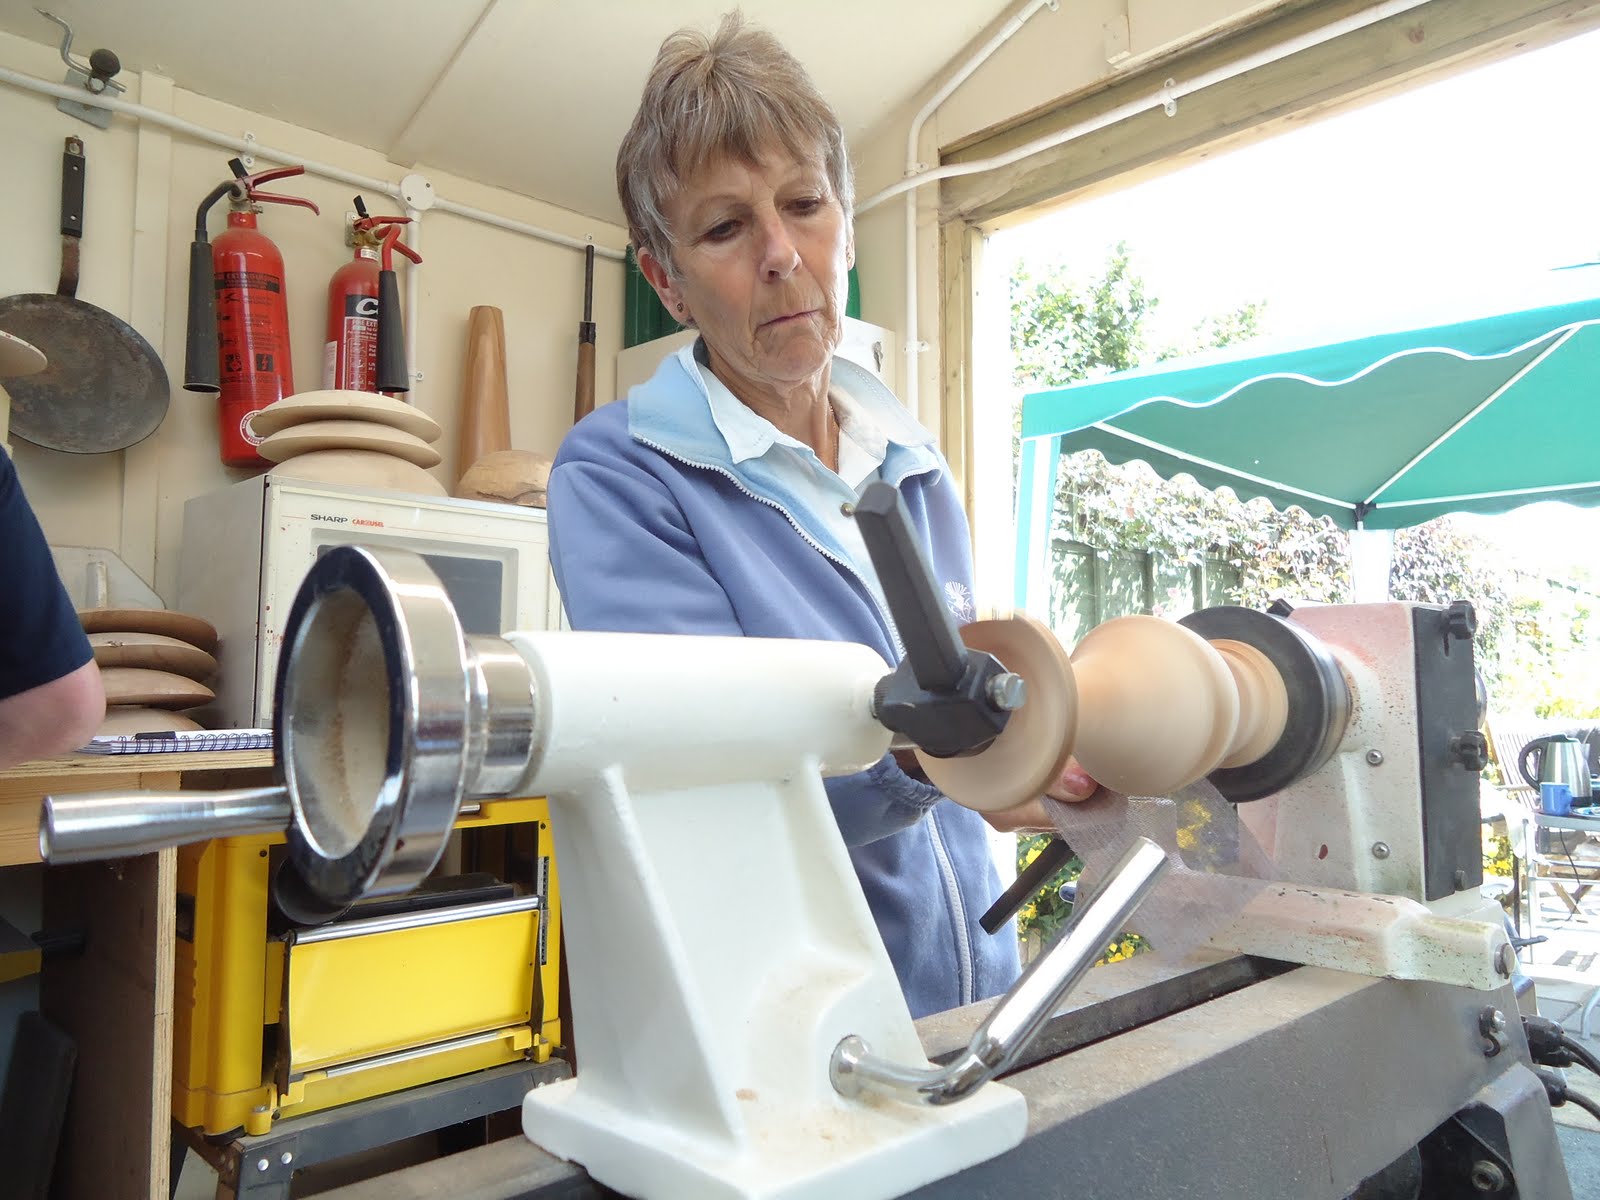
I started with this Sycamore blank that I had roughed out about three months ago it is quite dry and being about 11" wide just right for a nice wide rimmed bowl.
As you can see I have used a jam chuck and brought up the tailstock.

From here I can finish the bottom of the bowl sanded down to 600 grit and trued up the spigot ready to  fit in my 50mm C jaws.
I only leave a very shallow spigot because it is always tidied up and left as a foot.
In my opinion a bowl looks far better on a foot as it gives the bowl lift.
You also have the advantage of being able to remount the bowl if you want to make Any changes.

The bottom is now finished except any last tidying up of the foot
The rim is now flattened with a bowl gouge and if necessary a scraper then sanded down to 340 grit.
I very rarely power sand now as I find that using Abranet abrasive rubbed briskly across the grain as you sand avoids getting those nasty sanding lines around the piece.
When you are sanding don't press to hard as all that does is generate heat and wear your abrasive out.
I always start with 120 grit then go through 150,240, 320,600 and finally buff of the lathe.
As you can see from the pic above I use a soft pad with the Abranet it works a treat.
After the rim has been sanded to 320 grit two coats of ebonising lacquer are applied.
As you can see nothing is done to the bowl centre at this stage.

Now this is where the experiment really starts.
I had visions of creating what would look like droplets on a pool of water randomly over the rim.
I removed the bowl from the chuck and placed it on the floor.
I thinned down some Jo Sonja's red whetted the bowl rim and dropped the thin paint from an eye dropper onto the rim.
As you can see it did not look anything like drops of water on a pool.
Not being someone that is easily put of I decided to carry on and try to create an effect with what I had.
The bowl was returned to the chuck and the piece spun at 1000 rpm.
As you can see from pic above it was just a load of splodges but after a spin this was starting to take shape.

That is the Jo Sonja's Turquoise Iridescent it looks good on the black background.
I did not want too many colours on this piece as I wanted a big contrast between the background and the colours.
In the next pic you can see that Red Iridescent has been added.This was done by flicking the paint at the rim as it turned at 1000 rpm.
This gave a very similar effect as what I had tried earlier but it was much easier.
To make the piece look more interesting I have applied some more over the rim with a brush on the edge of the inner bowl while piece was spun at 1000 rpm.this caused the paint to spread outwards creating a very nice pattern.
Finaly I added some Jo Sonja's Gold Iridescent over the red on the rim and called that it for colour.


Here is the finished bowl and I am very pleased with it.It has had one coat of clear lacquer in this pic but It will have several more before it is finished
As I said before just play with coulers and textures and you will be supprised what you will achieve.
I spend hours and hours trying differant things if I end up with something I dont like I just skim the rim of and start again.
If you are interested in one of our coarses there is one place left on 25th June the 26th is full but we still have places in September.Email me by clicking here