It would seem that a lot of visitors to this Blog are having problems leaving comments.
The easiest way is to sign up for a google account it is free and easy to do.
Google, Google account to sign up
Then when you have typed in your comment.
Click the Post comment it will then ask you to choose a profile
Click on the drop down box then click Google and your comment will be sent to me for approval.
This is to stop spam and abusive comments being printed.
It is always nice to get comments so please make the effort .
Another thing you can do is go to the bottom of the Blog click subscribe and you will be automatically notified of updates.
I have now added a facility at the bottom of the page to enable you to follow this Blog.
Just go to the bottom of the Blog and click Subscribe.
Sunday, 3 June 2012
Saturday, 2 June 2012
Creating a coloured bowl.
I have been making a lot of wide rimmed coloured bowls lately and I am frequently asked how I do them.What I am going to do here is go through the process from when I buy the wood to the finished bowl.
When I buy the wood for bowls I usually buy a bulk load enough to do about sixty to a hundred bowls.I get my wood from wood yards now because I use quite a lot .When I started and only made the odd bowl or hollow form I could get enough from local tree surgeons and whatever I could scrounge.
When I buy it it is always in board form.To get the best out of a board I have a lot of round disks which I place on the board.These are placed so as to get the most economical cuts and the most blanks possible.I mark around the disk with a pencil and mark the centre at the same time.It is important to mark the centre ready for when the tailstock is brought up to the blank. If you forget to mark it you then have a lot of wasted time later when roughing out.
To enlarge the pics left click on pic


Here I have cut up some Sycamore into sizes that I want for bowls and Vases


 The roughed out bowl is first trapped between the pressure plate and the tailstock ready to refine the bottom.
The spigot is trued up ready to reverse chuck and the bottom is sanded up to the spigot.At this stage the spigot is not sanded that will be done at a later stage.
I don't hand sand or power sand anymore all of my sanding is done with the Hope sanding system I find this a lot quicker and easier.More info here.


 Next I apply a ring of Violet followed by a ring of Red and Violet mixed.
 It is not easy at this stage to distinguish between the colours as they stay quite white until dry.
Now I put a ring of thinned Gold very close to the bowl.I have thinned the gold because I want it to go over the other colours when I spin it in the lathe.
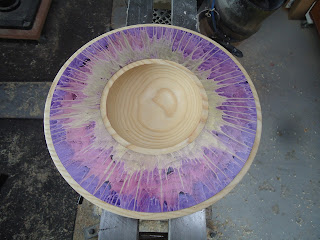
 Now the bowl is put back on the lathe and spun.This bit is critical too fast or too long and all you get is a mess.this was spun at 360 RPM for no longer than about 5 seconds.Remember if you have not spun it enough you can always spin it again.If you spin it too much you will have to do all the colouring again.
 Because the paint is thick it will take a bit of time to dry but I will speed it up carefully with a hot air gun. It does not look great at this stage but when it is dry and the bowl area is skimmed out it will be OK.
I have speeded up the drying time and have shaped and scraped the inside of the bowl.Again I use the Simon Hope sanding system but for the inside I use the 2" pad.


 I then apply two coats of Acrylic gloss lacquerer and allow to dry.
When it is dry I burnish the lacquerer inside the bowl and the rim.
The bowl is then put back against the pressure plate to do the final sanding on the bottom.This includes reducing the thickness of the spigot to turn it into a shallow foot.
 As you can see a small area of the foot is left to support the bowl against the pressure plate but is easily removed with a carving tool or chisel.
 The foot is then tidied up with a sanding arbour in a bit of spare wood made for the job.
 The bottom is now done and signature added ready to be buffed.
 The buffing is done with an 8" soft wheel anda block of white stick that Mark Sanger gave me about 5 years ago.I don't know where it comes from or what it is called but I understand it is for buffing stainless steel.
 Just a couple of coats of Renaissance wax and we are done.


 I hope some of you have found this interesting.Please leave comments and sign up to my Blog to receive updates.
Some days I have got as many as 300 page views on my Blog and no comments.If you cannot be bothered to sign up or leave comments how am I expected to know if you want me to carry on as it is quite a lot of work to do one of these tutorials.
When I buy the wood for bowls I usually buy a bulk load enough to do about sixty to a hundred bowls.I get my wood from wood yards now because I use quite a lot .When I started and only made the odd bowl or hollow form I could get enough from local tree surgeons and whatever I could scrounge.
When I buy it it is always in board form.To get the best out of a board I have a lot of round disks which I place on the board.These are placed so as to get the most economical cuts and the most blanks possible.I mark around the disk with a pencil and mark the centre at the same time.It is important to mark the centre ready for when the tailstock is brought up to the blank. If you forget to mark it you then have a lot of wasted time later when roughing out.
To enlarge the pics left click on pic

With the blanks all marked out I then cut them up on the bandsaw.Obviously it is not possible to cut the rounds out of a long board so I simply cut them all into squares and then rounds.


The bowl blanks are then roughed out and put away for about one to two years or until they are dry enough to finish.I stack them up on top of each other and leave them to dry and get very few that split.Sycamore and Beech are quite forgiving and dry well.


I only do two shapes to the bottoms of my bowls as the following two pics.


The spigot is trued up ready to reverse chuck and the bottom is sanded up to the spigot.At this stage the spigot is not sanded that will be done at a later stage.
I don't hand sand or power sand anymore all of my sanding is done with the Hope sanding system I find this a lot quicker and easier.More info here.


With the bottom sanded and the spigot trued up the bowl is reverse chucked and the rim trued up and sanded.

Now I apply two coats of Ebonising lacquer to the rim it does not matter about it going in the bowl as it will be skimmed out later.It does not matter if the grain shows as the colour will hide it.If I do not want any grain to show I go over the rim with a flexible filler that is sanded to 600 grit before applying the ebonising lacquer.

The ebonising lacquer dries very quickly and the piece is now ready for colour.I am going to use three colours of the JoSonja's Iridescent paint system Red,Violet and Gold.
I will be applying the paints with a pastry brush.
First I apply a ring of red to the outside of the rim


Now I put a ring of thinned Gold very close to the bowl.I have thinned the gold because I want it to go over the other colours when I spin it in the lathe.


I have speeded up the drying time and have shaped and scraped the inside of the bowl.Again I use the Simon Hope sanding system but for the inside I use the 2" pad.

With the bowl sanded it is time to create a narrow band on both sides of the rim.I do this with a skew chisel on its flat making sure it is level or trailing to avoid a dig in.These are then sanded down to 600 grit the same as the rest of the bowl.


When it is dry I burnish the lacquerer inside the bowl and the rim.
The bowl is then put back against the pressure plate to do the final sanding on the bottom.This includes reducing the thickness of the spigot to turn it into a shallow foot.


Some days I have got as many as 300 page views on my Blog and no comments.If you cannot be bothered to sign up or leave comments how am I expected to know if you want me to carry on as it is quite a lot of work to do one of these tutorials.
More stock.
These are a mixture of Sycamore and Beech varying in size from 7" to 12".I am making some extra stock so that I can make changes in the Galleries I supply and in September I have an open workshop for two weeks.The open workshop is with Somerset Art works and abut 300 local artists and Craft Makers participate. More info here More stock more chance of sales hopefully.
To enlarge pics left click on pick.


To enlarge pics left click on pick.


Subscribe to:
Posts (Atom)