Earlier in the week Derek was my student here for two days Bowl turning to include some texturing and colour.
The first day Derek turned a nice plain Beech Bowl.
On the second day the plan was for Derek to turn an Ash bowl and create some texture and colour.
Derek making the beads with the Ashle Isles beading tool
A gentle scorching to add some colour and to remove some soft grain
Removing soft grain with a bronze bristle brush
Verdigris wax scrubbed well into the grain.
Wax part removed with kitchen towel
More wax removed with Lemon oil to highlight the grain.
The Ash bowl was completed by lunch time ont the second day as you can see we spoil our Students
After lunch the rest of the day was spent showing Derek several different techniques for decorating a wide rimmed Bowl.
These techniques are shown in following pics.
The rim on this Sycamore blank is carved using the Arbortech fitted with the King Arthur chainsaw type cutter.
The rim has now been textured over the top of the carving with the Crown Tools texturing tool
Rim lightly scorched
The rim has now been coloured with Chestnut spirit stains Red Oronge and yellow to give a graded effect.
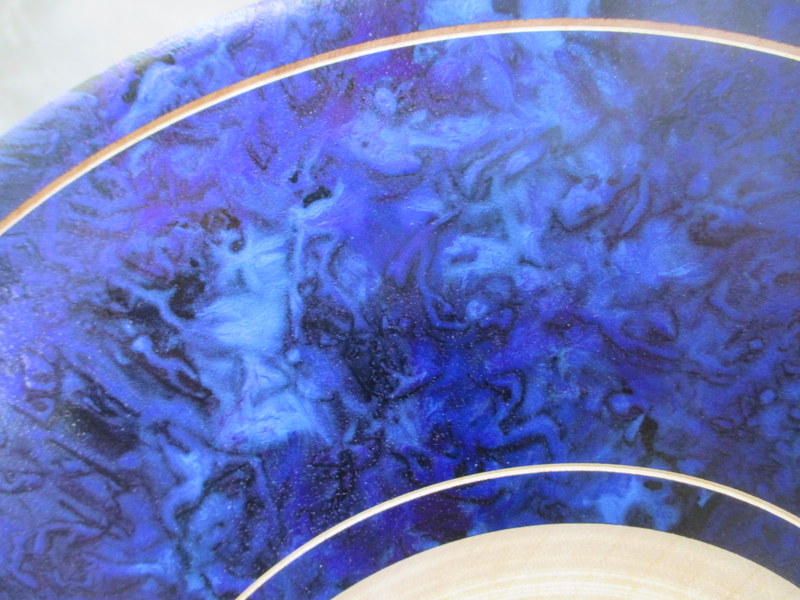
The rim of this Sycamore blank has been coloured with the new Chestnut Iridescent paints
First the rim is coloured black with Chestnut Ebonising lacquer then colours applied with a sponge in the following order Purple Vivid blue and Azure.
Lines carved to highlight rim
The rim has now been carved with Arbortech V shaped carver
This next bowl is coloured with Martin Saban Smiths's Intrinsic Colour Collection
First the Sycamore Blank is coloured black
In this picture a lot of the black has been sanded back and the first colour Ruby applied
As you can see in this picture some more areas have been sanded back and Flame is applied
More areas sanded back and the final colour Honey applied
The rim is grooved and two coats of Lacquer applied
Here is Derek with the two bowls he completed and took home.


What did I expect? What did I get?
ReplyDeleteMy experience of woodturning is from club and show demonstrations and I am otherwise mainly self-taught. I expected to get hands on professional tuition in a good workshop from this course.
On arrival I received a fabulous, warm welcome from George, but probably more importantly from “the Boss”, Sue. She looked after us with refreshments and kindness which was matched by George’s professional approach to woodturning.
The first day was spent on safety, tool sharpening techniques of tool use and bowl completed. What a lot I learnt!
The second day commenced with putting into practise what I had learnt from the first day’s tuition but the bulk of the time involved textures; how they are created and combined with finishes. This included not only proprietary brands but also George’s techniques for colouring and decoration.
I came away with two of my creations, but more importantly, to me, a sense of achievement and plenty of inspiration for future projects. We had plenty of “banter” in a totally relaxed atmosphere but this did not detract from the intense learning situation. The course had totally lived up to my expectations.
Thanks, George (and Sue) for looking after an “old codger”!